How to use CEGUI with SDL and OpenGL
Written for CEGUI 0.7.5
Works with versions 0.7.5.x (obsolete)
This tiny HOW-To simply illustrates with a full, runnable example, how CEGUI can be used with SDL and OpenGL.
It shows:
- a minimal example
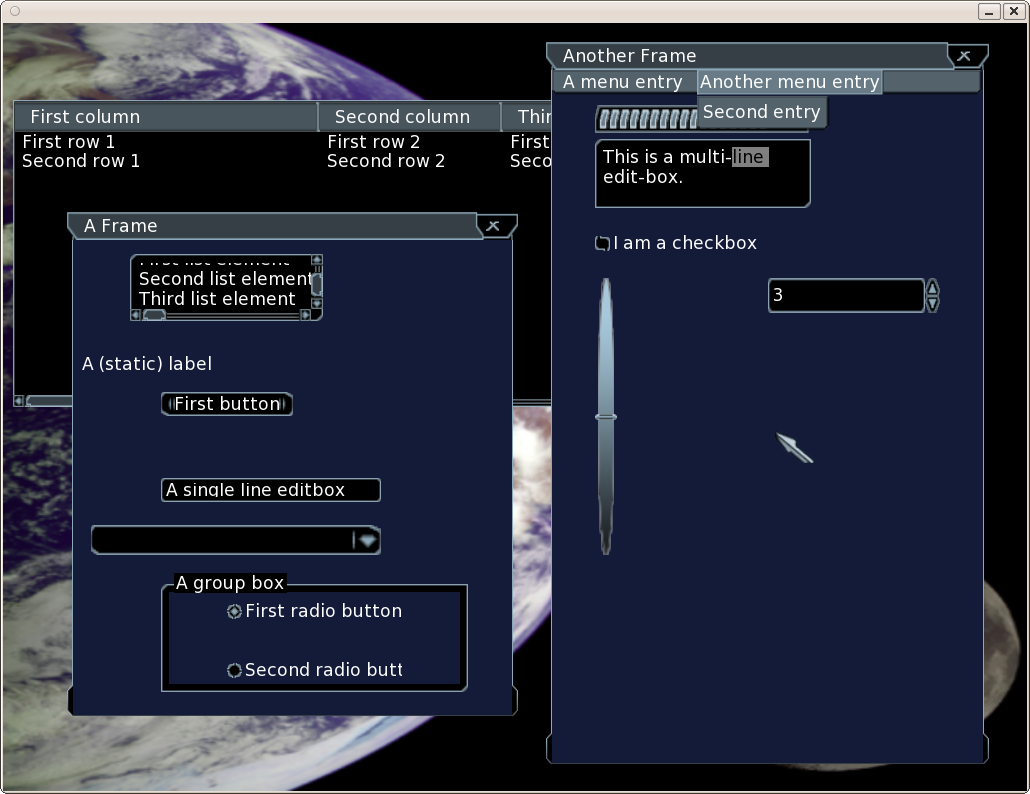
- a more involved example that includes most of the CEGUI widgets that are available (with the Taharez Look)
The platform used here is GNU/Linux.
Contents
Common Topics
Prerequisites
CEGUI depends on various libraries. We used:
- FreeImage [3.15.0] (note: its install must be fixed if targeting a prefixed directory rather than the default one in the system tree; anyway pre-0.8 versions of CEGUI's will need to have FreeImage installed in the system)
- PCRE [8.12] (note: if building if from sources, specify the following configure option:
--enable-unicode-properties - FreeType [2.4.3]
If you installed PCRE or FreeType in a prefixed directory, prior to executing CEGUI's configure you should specify in your shell respectively:
export pcre_CFLAGS="-I${pcre_PREFIX}/include"
export pcre_LIBS="-L${pcre_PREFIX}/lib -lpcre"
and
export freetype2_CFLAGS="-I${freetype_PREFIX}/include -I${freetype_PREFIX}/include/freetype2"
export freetype2_LIBS="-L${freetype_PREFIX}/lib -lfreetype"
We used SDL version 1.2.14.
Finally, GLUT is needed for the CEGUI's samples, Ubuntu users may thus execute beforehand, as root:
apt-get install libglut3-dev libglut3
For CEGUI itself, we used the following configuration options: --enable-debug --disable-lua-module --disable-python-module
Locating Resources
For default CEGUI's resources to be found (ex: fonts, images, etc.), the test program must be able to find out what are their paths, which are relative to the place where CEGUI was installed. One must thus update accordingly in the example the CEGUIInstallBasePath variable so that it points to a directory from which /share/CEGUI/ can be found.
Example:
const std::string & CEGUIInstallBasePath = "/home/joe/my-CEGUI-0.7.5-install" ;
Building The Examples
A simple yet powerful enough makefile could be this File:GNUmakefile. The main point is to set correctly the compilation and linking flags for SDL and CEGUI.
Then the build should be as easy as:
$ make clean all
   Cleaning
   Compiling CEGUI-SDL-all-widgets.o
g++ -c CEGUI-SDL-all-widgets.cc -o CEGUI-SDL-all-widgets.o -I$LOANI_INSTALLATIONS/CEGUI-0.7.5/include/CEGUI `$LOANI_INSTALLATIONS/SDL-1.2.14/bin/sdl-config --cflags`
Linking CEGUI-SDL-all-widgets.exe
g++ -o CEGUI-SDL-all-widgets.exe CEGUI-SDL-all-widgets.o -L$LOANI_INSTALLATIONS/CEGUI-0.7.5/lib -lCEGUIOpenGLRenderer -lCEGUIBase `$LOANI_INSTALLATIONS/SDL-1.2.14/bin/sdl-config --libs`
Compiling CEGUI-SDL-hello-world.o
g++ -c CEGUI-SDL-hello-world.cc -o CEGUI-SDL-hello-world.o -I$LOANI_INSTALLATIONS/CEGUI-0.7.5/include/CEGUI `$LOANI_INSTALLATIONS/SDL-1.2.14/bin/sdl-config --cflags`
Linking CEGUI-SDL-hello-world.exe
g++ -o CEGUI-SDL-hello-world.exe CEGUI-SDL-hello-world.o -L$LOANI_INSTALLATIONS/CEGUI-0.7.5/lib -lCEGUIOpenGLRenderer -lCEGUIBase `$LOANI_INSTALLATIONS/SDL-1.2.14/bin/sdl-config --libs` rm CEGUI-SDL-all-widgets.o CEGUI-SDL-hello-world.o
A Minimal Example
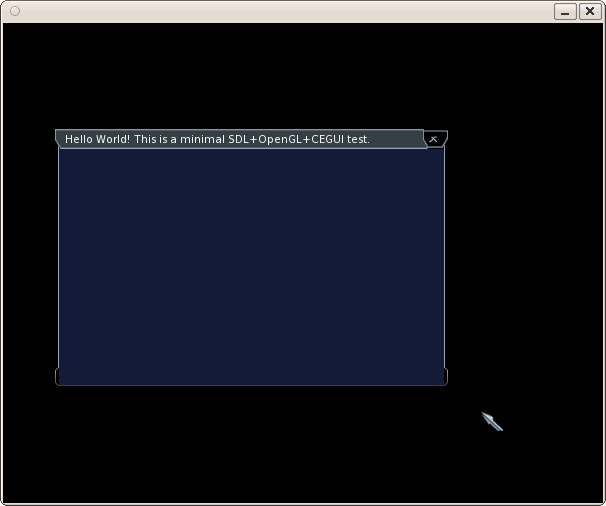
As you can see in File:CEGUI-SDL-hello-world.cc, it is quite short and easy to understand.
The point is first to initialize correctly SDL (notably for OpenGL and input settings) and CEGUI (mainly with regard to resource paths).
Then the application-specific GUI itself is to be created, here fully from code (rather than thanks to XML description files).
The main loop can then be run, it just iterates endlessly through the following steps:
- inputs (including wallclock-timing) are collected from SDL and then fed appropriately to CEGUI
- GUI is requested to update its rendering accordingly
Here is a corresponding screenshot:
An Example With Most Widgets
The purpose of this example is to show most CEGUI widgets in the Taharez Look, in order for a developer to know what are the GUI elements that he can use. No wiring or event processing is done for them, we just want to showcase the available widget toolbox.
This more complex example is simply built on the minimal one.
Here is a corresponding screenshot:

